maxYMiser
An Atari ST YM2149 chip tracker
Instrument editor
Sequences principleThe instrument system in maxYMiser is based on sequences.
Basically you've got to edit/assign sequences of values to parameters you want active in your instrument. These sequences are interpreted step by step according to the sequence speed of your instrument (excepting for timer parameter which is unaffected by this setting).
The lower the sequence speed is, the faster the sequences will be interpreted (01 being the minimum). Note that these sequences are shared over all the instruments of your tune.
So you don't have to create many sequences with same content if you want to have the same value(s) for the same parameter over several instruments of your tune, you can just use the same sequence for all those instruments.
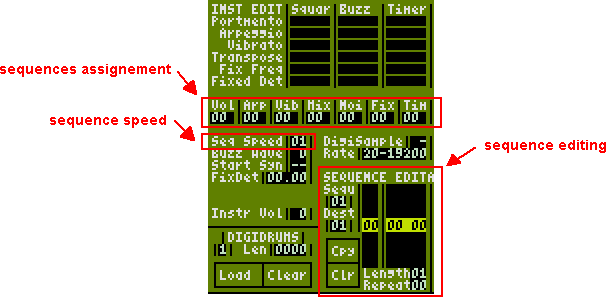
To edit a sequence you've got to click in the sequence editor (or use Control+Q shortcut).
You can add or remove steps in your sequence with Insert and Delete keys.
You can also set the sequence length before editing it, by setting the length field.
The repeat field sets the loop point of your sequence.
Each parameter uses sequences in a specific way:
Volume wave: Input volume levels, from 0 (lower) to F (higher).
Recommendation: Work with sequences based on full volume and set the general volume of the instrument (see Other parameters part).
Example (fade out):
00|00 0F

01|00 0C

02|00 07

03|00 03

04|00 00
...with repeat at step 04 (so that the sound stays at volume 0 after fade out).
Arpeggio: Input note shifting steps (current note being 0).
Example (two octave arpeggio):
00|00 00

01|00 0C
...with repeat at step 00 (so that the arpeggio loops).
Vibrato wave: Input YM frequency variations (current frequency being 0).
Example:
00|00 00

01|00 01

02|00 02

03|00 03

04|00 04

05|00 05

06|00 04

07|00 03

08|00 02

09|00 01

10|00 00
...with repeat at step 00 (so that the vibrato stays while the instrument lasts).
Mixer settings: Set the sound types of your instrument.
1st column: noise (0 inactive, 1 active)
2nd column: square (0 inactive, 1 active)
3rd column: buzzer (0 inactive, 1 active)
4th column: timer effect type (0 inactive, 5 sid, B syncbuzzer, D digidrum)
Example (square wave + noise):
00|11 00Example (classic combination square wave + sid):
00|01 05Example (digidrum):
00|00 0DNoise wave: Input the noise frequencies, from 00 to 1F.
Example:
00|00 1FFixed frequency: Input the YM frequencies.
Example (fixed at C-1):
00|0E EETimer wave: For SID timer effect, input the levels of the waveform, from 0 (lower) to F (higher).
Example (basic square wave, usually used for classic sid):
00|00 0F

01|00 00
...the repeat value is not used for the timer sequence.
For syncbuzzer timer effect, input the buzzer waveforms, from 0 to F.
Digidrums If you've set the mixer to digidrum sound type, you've now got to load and assign a sample to your instrument.
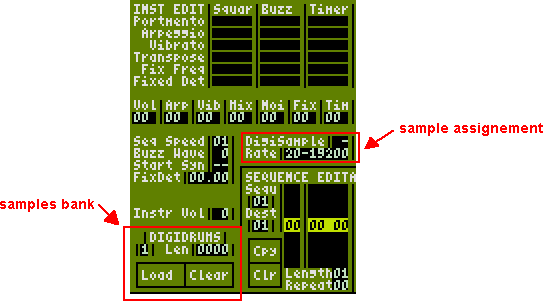
Select the sample number in the samples bank where to load your sample (8 at max).
The sample should be in 8bit signed RAW (no header) format with a 16kb max size.
After that, assign the sample to your instrument by entering its number in the digisample field.
You can set the sample replay frequency in the rate field.
Note: the higher the sample replay frequency is, the more CPU time it will take.
Here is an example of a digi sound
Effects assignment: With the Mixer parameter you've already set the sound types of your instrument.
You can now assign effects to square, buzzer or timer (if set to sid or syncbuzzer) by activating them in the effects matrix.
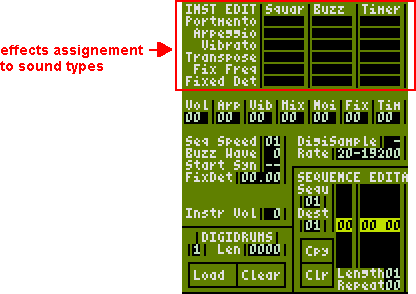
Portamento: Activate the portamento tracker command on this sound type.
Arpeggio: Activate the arpeggio instrument parameter and/or tracker command on this sound type.
Vibrato: Activate the vibrato instrument parameter on this sound type.
Transpose: Activate the transpose tracker command on this sound type.
Fixed Frequency: Activate the fixed frequency instrument parameter on this sound type.
Fixed Detune: Activate the fixed detune instrument parameter on this sound type.
Other parameters
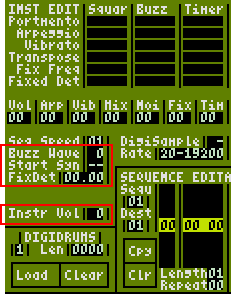
Buzzer Wave: If buzzer sound type is activated in the mixer, select the buzzer wave here (note that not every buzzer wave make sound).
Start Synchronised: Synchronisation of the square wave, buzzer wave and timer wave.
Fixed Detune: Set the detune offset here, first column is for semitone detuning and second column is for YM frequency detuning (more precise).
Instrument Volume: Set the general volume of the instrument, this value will be subtracted from the volume values of the volume wave. This allows you to work with volume sequences based on full volume then set or change the general volume of the instrument here.
For example this fade out wave:
00|00 0F

01|00 0C

02|00 07

03|00 03

04|00 00
...along a general volume of 2 will become for this instrument:
00|00 0D

01|00 0A

02|00 05

03|00 01

04|00 00
Instrument creation - step by step
Start with a short square wave instrumentFirst, let's deal with the mixer:
Select the sequence 01 in the sequence editor.
Edit it and enter 1 in the second column to activate square wave in the mixer.
00|01 00Assign sequence 01 to Mixer setting.
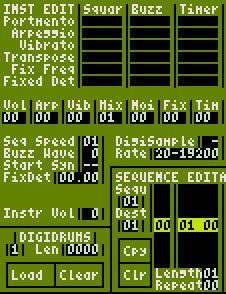
Now, the volume:
Select the sequence 02 in the sequence editor.
Edit it and enter the following values to produce a fade out volume wave:
00|00 0F

01|00 0D

02|00 0B

03|00 09

04|00 07

05|00 05

06|00 03

07|00 00
...with Repeat at step 07.
Assign sequence 02 to Volume setting.
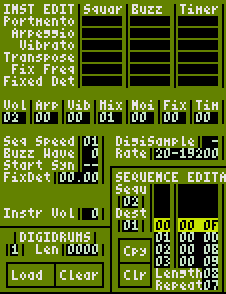
Test it on the keyboard, it makes sound!
Really short sound though... try setting Sequence Speed at 03.
Now the fade out is slower as instrument sequences are interpreted slower.
Add sid
First, modify the mixer parameters:
Select the sequence 01 in the sequence editor.
Edit it and enter 5 in the fourth column to activate sid timer effect in the mixer.
00|01 05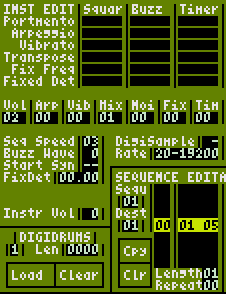
Then add the sid waveform:
Select the sequence 03 in the sequence editor.
Edit it and enter the following values to produce a square wave like classic sid:
00|00 0F

01|00 00
...with Repeat at step 00.
Assign sequence 03 to Timer setting.
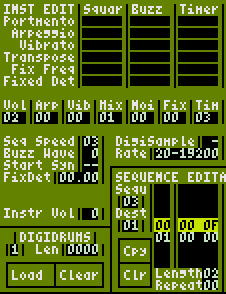
Test it on the keyboard: "weeiioouu"
Sid is in the house! (yeah it was a sid sound in text form...)
Add arpeggio
Select the sequence 04 in the sequence editor.
Edit it and enter the following values to produce an arpeggio on two octaves:
00|00 00

01|00 0C
...with Repeat at step 00.
Assign sequence 04 to Arpeggio setting.
Activate Arpeggio effect on Square and Timer sound types.
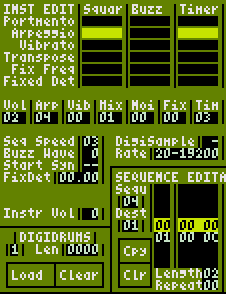
Test it on the keyboard, arpeggiated!
You can download this example sound here. See? Easy!
Now create, experiment, produce new sounds and compose great new tunes!
Oh, and read the manual coming with the tracker, many things are clearer after that...